GitHub Webhooks and Cloud Functions
Some GitHub repositories are not just source code for apps, they can also store data files holding JSON, YAML, XML or any other file format e.g.
- A collection of reference data such as this countries of the world GeoJSON.
- “Infrastructure as code” files, such as Terraform configuration.
In this blog post we’ll create an IBM Cloud Function that is triggered by a commit to a GitHub repository, which stores a copy of JSON data from GitHub in a Cloudant database.
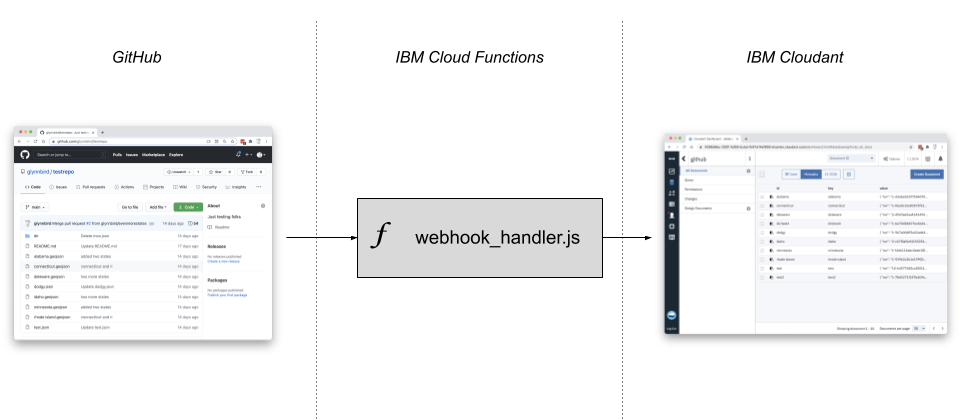
The Cloudant-based mirror of the data can then be indexed, searched and used for operational use-cases while staying in near real-time sync with the GitHub reference.

Photo by Brady Rogers on Unsplash
Prequisites:
- An IBM Cloud account
- A GitHub account
Step 1 - IBM Cloud Function🔗
First we are going to create an IBM Cloud function which will be called for every GitHub commit.
- Visit the Functions dashboard in the IBM Cloud.
- Click on Actions
- Then “Create” —> “Action”
- Give your action a name and chose the Node.js runtime. Click “Create”.
- Cut and paste the code from here into the source editor and click “Save”
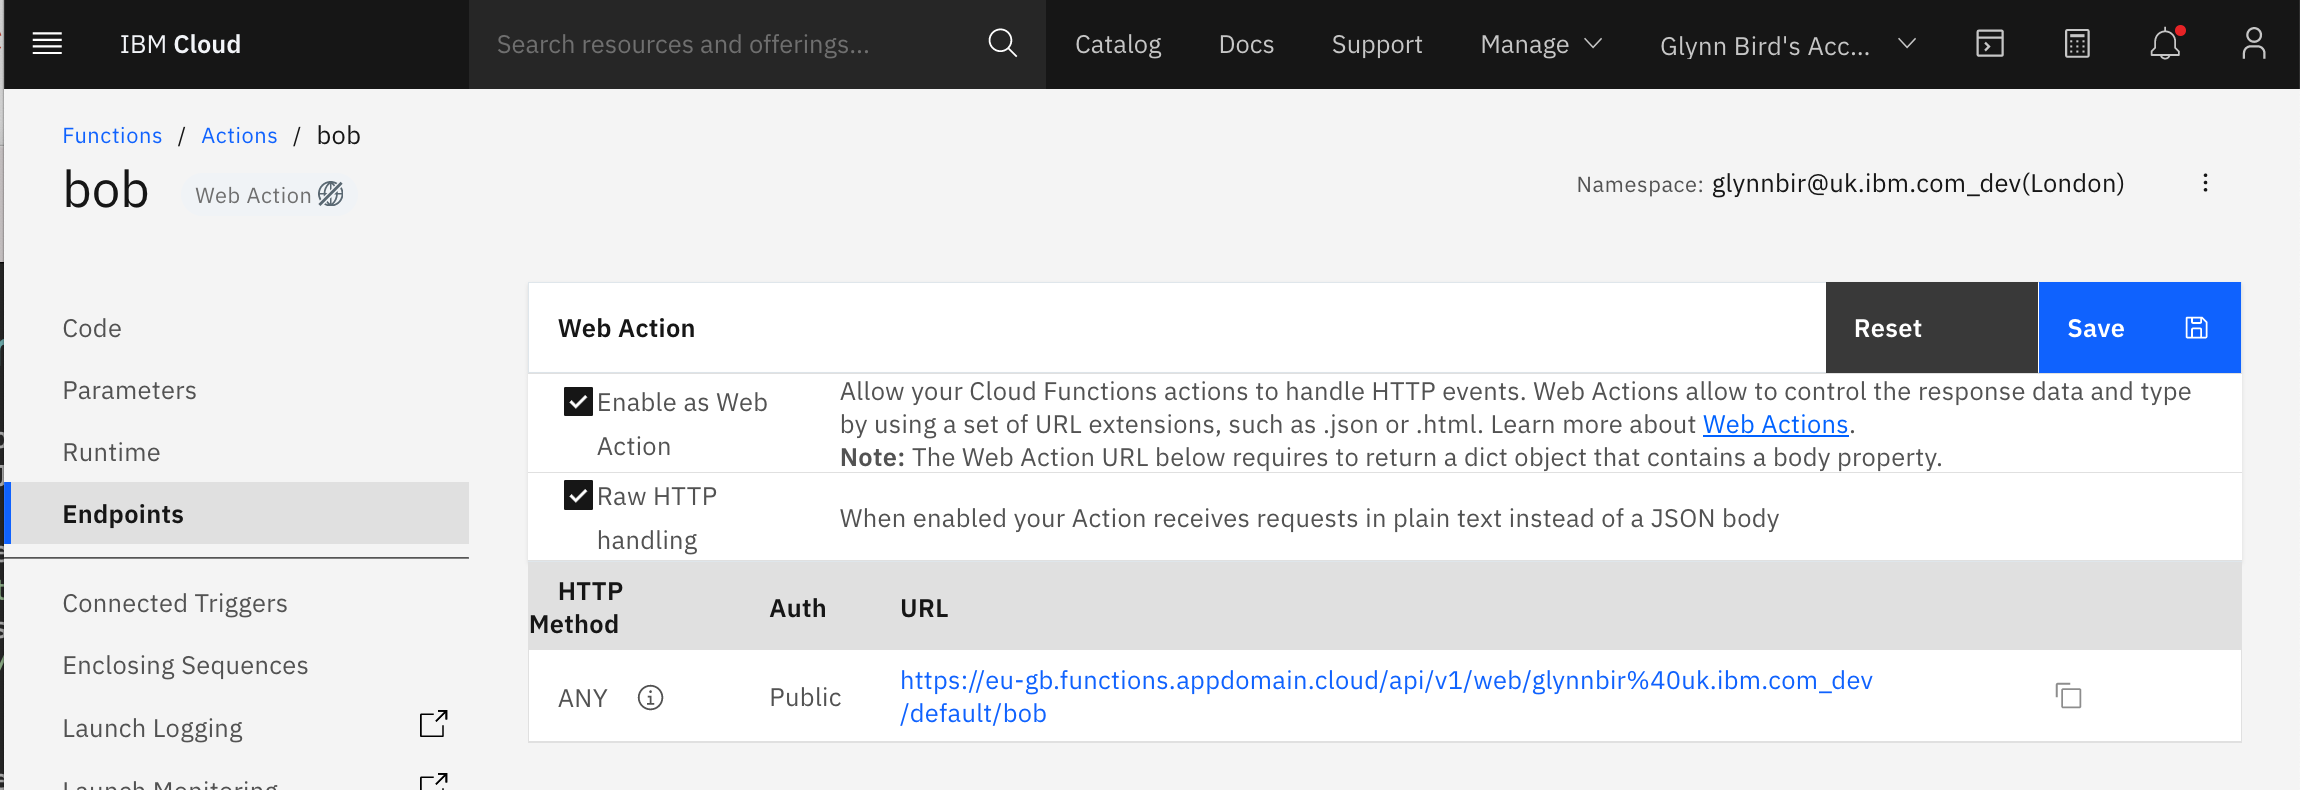
- In the “Endpoints” panel, tick the “Enable as Web Action” and “Raw HTTP Handling” tick boxes and click “Save”. A web action has an public HTTP endpoint which will we will plumb into the GitHub Webhook system. It needs to be sent the raw HTTP body because we need to calculate a cryptographic signature of the data to verify that it came from GitHub and not a malicious soure.
- Make a note of the URL of your Cloud Function - we’ll need this URL in the next step.
Step 2 - GitHub WebHook🔗
- Create a new GitHub repository.
- In the repository’s Settings panel, under the Webhooks sub-menu, click “Add webhook”.
- Enter the URL from the first step, choose a content type of “application/json” and enter a secret. Make a note of the secret, as we’ll need it in step 4. Click “Add Webhook”
Step 3 - Create a Cloudant service🔗
- In the IBM Cloud dashboard, browse the catalog to find the Cloudant service.
- Choose a region, set the authentication method to “IAM and legacy credentials” and choose the plan (Lite is free). Click “Create”.
- Once provisioned, in the service’s “Service Credentials” menu, click “New Credential”.
- Inspect the newly created credential and make a note of the “url” field - we’ll need this in Step 4.
- Visit the Cloudant dashboard and create a new database called “github”.
Step 4 - Configuring the Cloud Function🔗
- Revisit the Cloud Function you created in Step 1.
- Under the “parameters” menu add two new parameters:
-
GITHUB_SECRET- the secret generated in step 2.
-
COUCH_URL- the Cloudant URL generated in step 3.
- Note that the two parameters each need to be enclosed in double quotes.
Step 5 - That’s it!🔗
Try creating, editing and deleting JSON documents in your GitHub repository - you should see them mirrored in your Cloudant service’s “github” database.
Note that data only travels one way: from GitHub to Cloudant.
What else can you do with this?🔗
- Other data formats. Currently this script only accepts data from
.jsonor.geojsonfiles, but it could be extended to convert other formats e.g. YAML, into JSON before writing the data to Cloudant. - Add indexing and querying. Using Cloudant’s extensive indexing options, the Cloudant copy of the data could be used to provide a read-only API for this data, allowing API clients to retrieve slices of data of your choosing.
Limitations🔗
The serverless function assumes that the commit it is processing can be written to Cloudant in one bulk write, but some GitHub commits or squashed pull requests could add up to many megabytes, exceeding the size of a single Cloudant write.
Cloudant documents are limited to 1MB - adding larger documents to GitHub would result in a failure to write them to Cloudant.