HAProxy as a reverse proxy
The IBM Cloudant helps you build a flexible disaster recovery capability into your applications through a cross-region disaster recovery setup using either active-passive or active-active configuration. For either configuration, IBM Cloudant doesn’t provide a facility to manage explicitly any failover or reroute requests between Cloudant regions and has to be implemented within the application logic itself, or by using a load balancer/proxy. To enable auto-failover, we can put an HTTP proxy server in front of IBM Cloudant and then configure our application to talk to the proxy server rather than the IBM Cloudant instance directly. This would be easy, efficient, and save time compared to doing it through application logic.
Prerequisite : Set up an active-passive configuration that uses two IBM Cloudant accounts, one in each region. Active-passive configuration is preferred as in the case of active-active configuration we have to additionally create a strategy for managing conflicts to avoid problems with multiple copies of data. For more information about setting this up, see Configuring IBM Cloudant for cross-region disaster recovery

Photo by Ira Huz on Unsplash
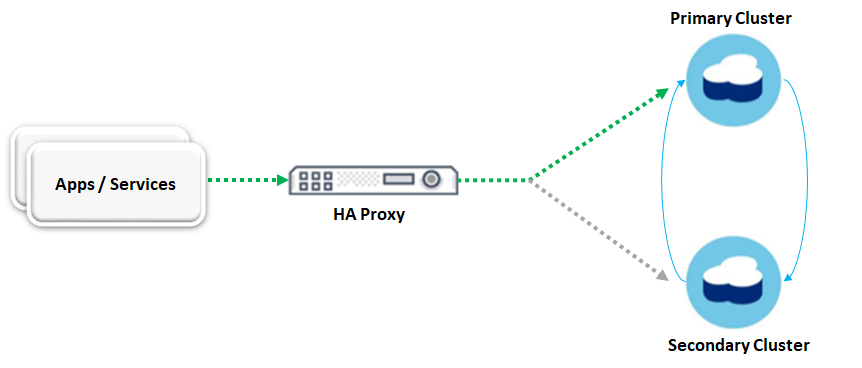
In this article, we will use HAProxy or High Availability Proxy to direct traffic to one of two Cloudant instances(active-passive configuration) with auto failover to the backup Cloudant instance.
Target architecture with HAProxy as a reverse proxy🔗
Key Considerations for the setup🔗
- HA Proxy should route traffic to the primary Cloudant instance as long as it is up.
- HA Proxy should automatically route traffic to secondary Cloudant instance if the primary instance goes down.
- HA Proxy should automatically route traffic back to the primary Cloudant instance as soon as it is up again.
How to check if the Cloudant instance is up?🔗
Cloudant offers a simple way to know if it is available or not through the _up endpoint. So all we have to do is ping this endpoint as a ‘heartbeat at a regular interval of time. For example, a simple GET request(let’s say in every 5 seconds) sent to this endpoint to see if the “200” response code is returned. As long 200 response code is received, traffic is routed to the primary Cloudant instance. If HAProxy receives a status code other than 200, then it would automatically route traffic to the secondary Cloudant instance.
Let’s get started with the configuring HA Proxy🔗
Step - 1) Install HA Proxy
It is really easy to install HA Proxy and for this article, we will be using Ubuntu OS. Commands to install a specific version of HA proxy are as follows.
add-apt-repository ppa:vbernat/haproxy-2.2
apt-get update
apt-get install haproxy / sudo apt-get install -y haproxy
Note: Choose the latest HA Proxy stable version.
Verify the installation by checking the HAProxy server version
haproxy -version
Step - 2) Configure frontend, backend and enable statistics for HAProxy
Go to the path "/etc/haproxy" and edit the haproxy.cfg file in any editor e.g vi or vim and add frontend, backend and enable statistics as shown in the below configuration.
For simplicity, I would demonstrate it using HTTP, but it could also be configured for HTTPS.
global
(...)

defaults
(...)

listen stats
	bind *:9090
  	stats enable
  	stats uri /stats
  	stats auth admin:admin@123
  	stats refresh 30s

frontend db_frontend
	bind *:80
	mode http
    	use_backend db_cluster

backend db_cluster
	option httpchk GET /_up HTTP/1.1
	http-check send hdr Authorization Basic\ xXxXxXxX(base64encoded)xxXxXxxXxx=
	http-check expect status 200
    	http-send-name-header Host
	server primaryacct.cloudant.com 111.0.0.1:443 check inter 5s rise 2 fall 2 ssl verify none
    	server secondaryacct.cloudant.com 111.0.0.2:443 check inter 5s rise 2 fall 2 ssl verify none backup
Make relevant changes to the haproxy.cfg file and save it. Now let’s verify and reload the HAProxy configuration by using the below commands.
haproxy -c -f /etc/haproxy/haproxy.cfg
service haproxy reload
Let’s understand the HAProxy configuration🔗
listen stats
	bind *:9090
  	stats enable
  	stats uri /stats
  	stats auth admin:admin@123
  	stats refresh 30s
The above configuration would enable the HAProxy dashboard to show various information & statistics.
- bind: Sets which address and port you’ll use to access the dashboard.
- enable: Enables the statistics.
- stats uri: Set the path to access the dashboard. e.g. server_ip_address:9090/stats.
- stats auth: Set the credentials to access the dashboard
- stats refresh: Configures how often the dashboard will automatically refresh within your browser, which in this case is 30 seconds.
frontend db_frontend
	bind *:80
	mode http
    	use_backend db_cluster
HAProxy dashboard🔗
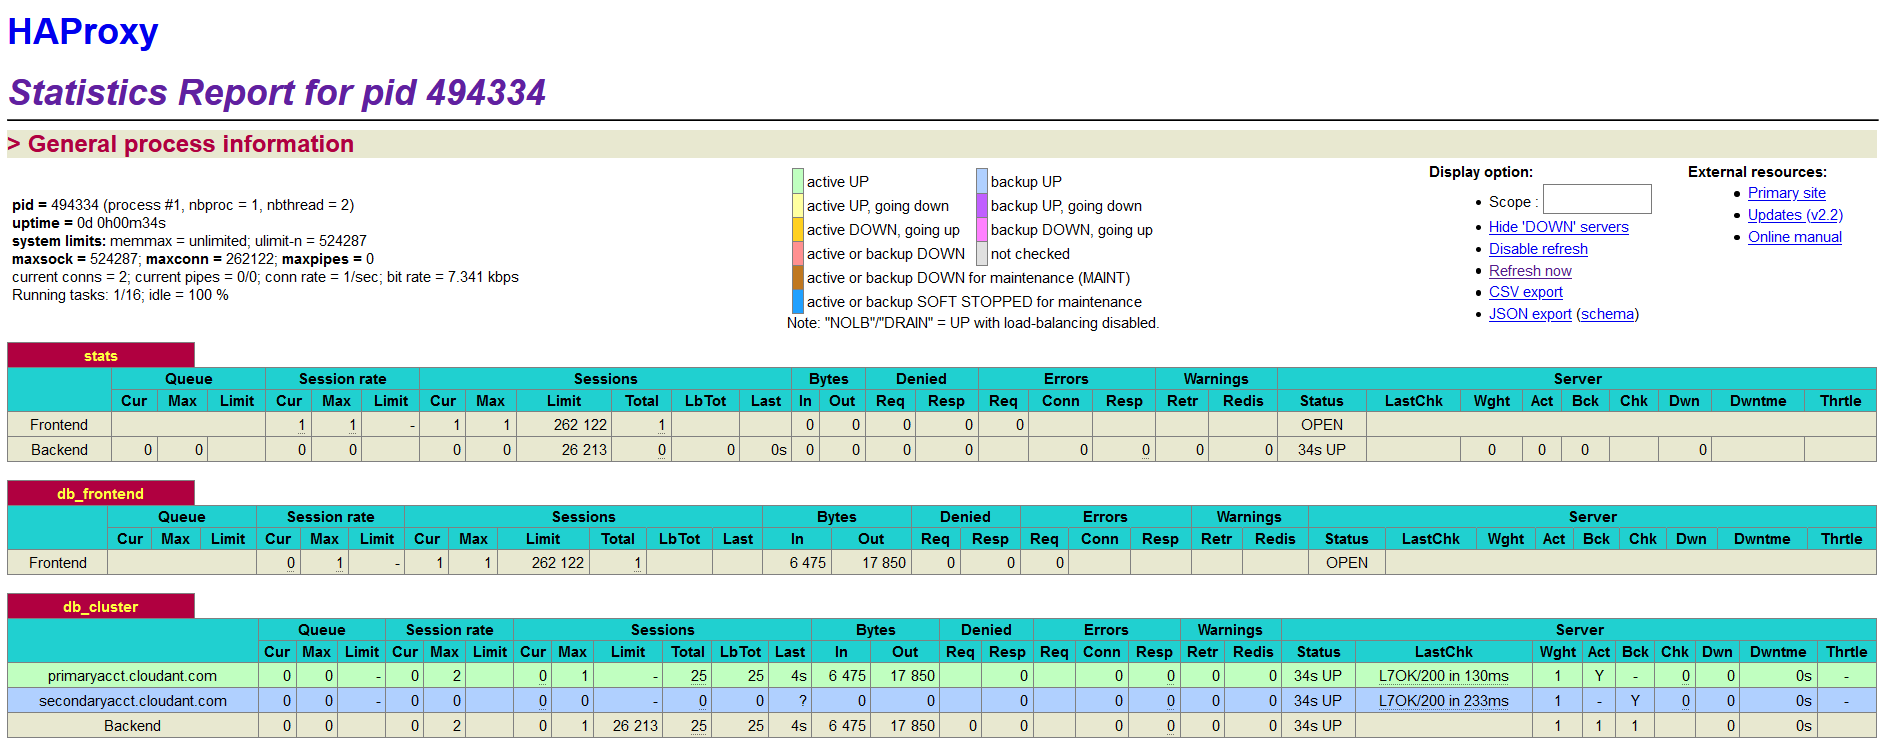
Note: Here the server with green color is the primary server and the server with blue color is the backup server. All the requests are served by the primary server unless it is down.
A frontend is what a client connects to. As requests enter the load balancer and as responses are returned to the client, they pass through the frontend. In the above configuration, HAProxy listens on default port 80 and forward requests to the backend.
backend db_cluster
	option httpchk GET /_up HTTP/1.1
	http-check send hdr Authorization Basic\ wcm9maWxlOm5(base64encoded)AxMjM0NTY=
	http-check expect status 200
    	http-send-name-header Host
	server primaryacct.cloudant.com 111.0.0.1:443 check inter 5s rise 2 fall 2 ssl verify none
    	server secondaryacct.cloudant.com 111.0.0.2:443 check inter 5s rise 2 fall 2 ssl verify none backup
A backend consists of a pool of servers and the requests are routed between the servers in a round-robin fashion making it a load balancer by default. To make HA Proxy behave like a reverse proxy rather than a load balancer, we have to make one server as active and the other server as passive. This could be achieved by using the keyword “backup” for the server. e.g. in the above configuration, secondaryacct.cloudant.com is the passive server, which will not receive any traffic unless the active server(primaryacct.cloudant.com) is down. And As soon as the active server comes back up, all the requests will fail back to it again. In this example configuration HAProxy polls the server on a fixed interval of 5 seconds which is described by the attributes check inter 5s and if not specified, the default value is 2 seconds. The attributes rise 2 fall 2 signifies the number of consecutive valid health checks before considering the server as UP and DOWN. The attribute ssl verify none instructs HAProxy not to check the validity of a server certificate.
In this example, we are configuring two different Cloudant services(one active, one passive) having different hostname. In order for HAProxy to communicate to Cloudant, we need to provide a HOST header having the value of Cloudant database hostname, without which Cloudant won’t honour the request. This could be achieved through the attribute http-send-name-header. By using the “Host” header with this option(e.g. http-send-name-header Host), the existing Host header would be overwritten with the new value from the server name which in this case are primaryacct.cloudant.com & secondaryacct.cloudant.com. The first three lines inside backend are responsible for making a GET call to the _up end point and expecting a response code “200” by passing credential through Authorization header.