Automatic Cross-region Failover
IBM Cloudant NoSQL database offers high availability through in-region automatic data redundancy by storing data in triplicate across three servers within a single region. In a true sense, achieving high availability and eliminating single point failure couldn’t be accomplished using a single region Cloudant setup. So, to address this, we have to consider doing two things:
- Configure cross-region redundancy by setting up Cloudant accounts in two or more regions, create databases in each region, and set up bidirectional continuous replications between the corresponding databases in each account.
- Configure automatic fail-over between IBM Cloudant regions using Cloud Internet Service (CIS) Edge function in IBM Cloud and will discuss more on this.

Photo by NASA on Unsplash
Note: For this article, I assume that the cross-region redundancy (with two regions) is already setup with active-passive configuration. For more information about setting this up, see Configuring IBM Cloudant for cross-region disaster recovery. We will consider setting up active-passive configuration because of the following two regions:
- The active-active configuration could cause an availability issue if one of the sites goes down.
- Applications that work within an active-active configuration must have a strategy for handling conflicts to avoid problems with multiple copies of data.
Target architecture with auto-failover mechanism:🔗
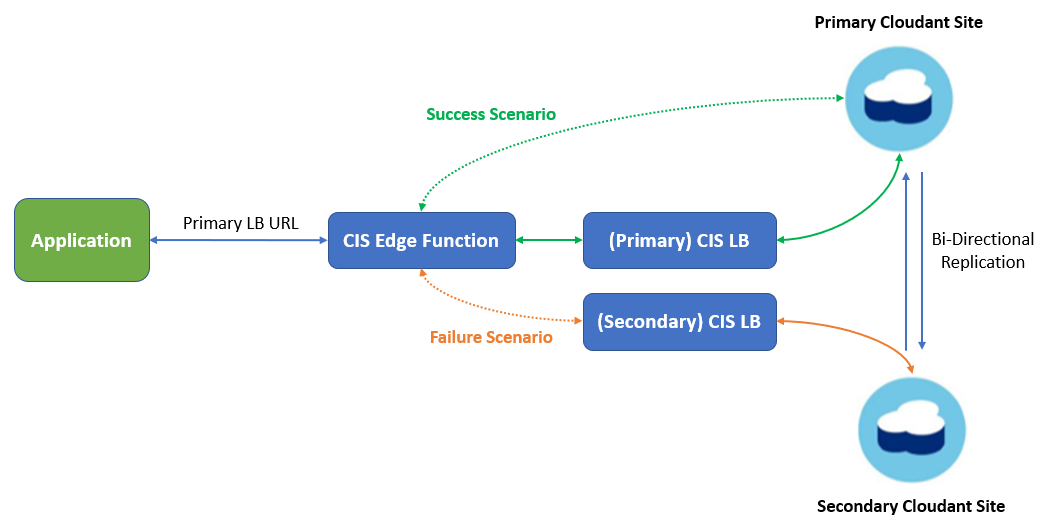
How does this setup work?🔗
First, we have to configure two CIS load balancers (LB) which points to primary and secondary Cloudant regions respectively. In addition to this, we have to explicitly set the database hostname as the “Host Header Override” value inside the “Page Rules” option in the CIS dashboard. Without this, Cloudant won’t honour the request as it would expect the host header value as “Cloudant database hostname”, whereas it will have the value as “CIS load balancer hostname”. Adding “Host Header Override” solves one issue but creates another. As the value inside it is hardcoded, it couldn’t be dynamically changed, so, effectively the load balancer starts behaving like a reverse proxy and can’t load balance between the primary or secondary Cloudant cluster. To get around this problem, we could use the CIS Edge function which could intercept any incoming request for a specific LB URL, before it reaches the actual LB and we could inject custom routing logic in there.
As shown in the above diagram, the CIS Edge function intercepts the primary CIS LB URL and checks if the primary site/region is up or not by pinging a database document inside it. If the primary site is up, CIS Edge function forwards the call to the primary Cloudant site. If the primary site is nonresponsive and the ping fails, then the request would be redirected to the secondary site/region automatically. As this check would be done on every incoming request to the CIS LB URL, it would add network latency, which could be minimized by adding a monitoring logic which would only check if the site/region is up or not in a specific time interval. For this example, we would use 15 seconds time interval, which means the CIS Edge function will check every 15 seconds if the site is up or not and accordingly forward the request to either primary or secondary Cloudant site.
Steps Involved:🔗
Step 1🔗
Configure primary CIS LB with Cloudant URL for the primary site and set the database hostname as the “Host Header Override” value inside “Page Rules” option in the CIS dashboard. On the CIS dashboard, you’ll see three lists that show the load balancers, origin pools, and health checks.
- First create a “health check”
- Create an origin pool and select the health check entry created in the above step.
- Create load balancer and select the origin pool created in the above step
- Create a page rule to set the Host Header Override for the LB URL
- In the CIS dashboard navigate to Performance -> Page Rules.
- Create a page rule for the LB URL, for example, https://primarycislb.ibm.net/*
- Select the Rule Behaviour setting Host Header Override.
- Set as the Cloudant database hostname, for example, primaryacct.cloudant.com.
Note : For more information on setting up the load balancer, follow this Link
Step 2🔗
Configure secondary CIS LB with Cloudant URL for the secondary site and set the database hostname as the “Host Header Override” value inside “Page Rules” option in the CIS dashboard. Follow the Steps mentioned above.
Step 3🔗
Create an Action under the CIS Edge function, which would check if the primary Cloudant site is up or not in a specific interval of time. e.g 15 seconds. If it is up, then the request is routed to the primary Cloudant site, if it is down than the request automatically gets forwarded to the secondary site.
- Open the “Edge Functions” page from the CIS instance dashboard.
- Click the “Create” icon on the “Actions” tab.
- Enter “cloudant-db-route” in the action name field.
- Paste the following source code into the action body section and click the “Save” button.
addEventListener('fetch', event => {
  event.respondWith(handleRequest(event.request));
});

// Global variable.
let lastPingTime = 0;
let result = '';

const headerInfo = {
  'Authorization': 'Base64 encoded Cloudant credential'
};
const config = {
  method: 'HEAD',
  headers: headerInfo
};

async function handleRequest(request) {
  let currentPingTime = Math.floor(Date.now() / 1000);
  if ((currentPingTime - lastPingTime) >= 15) {
    lastPingTime = currentPingTime;
    // Ping database document in Primary cluster
    let dbPing = await fetch('https://primaryacct.cloudant.com/cloudant-db-name/document-id', config);
    if (dbPing.status == 200) {
      result = true; /* Switch to Primary */
    } else {
      result = false; /* Switch to Secondary */
    }
  }

  if (result) {
    return fetch(request);
  } else {
    // Considering secondarycislb.ibm.net as the second CIS LB URL
    let url = request.url.replace('primarycislb',  'secondarycislb');
    let new_url = new URL(url);
    const modifiedRequest = new Request(new_url, {
      method: request.method,
      headers: request.headers
    });
    return fetch(modifiedRequest);
  }
}
Step 4🔗
Create a Trigger under the CIS Edge function which would intercept the primary CIS LB URL and invoke the Action we have defined in the earlier step.
- Select the “Triggers” panel from the Edge Functions page.
- Click the “Add trigger” icon.
- Set the Trigger URL to https://primarycislb.ibm.net/*
- Select the “cloudant-db-route” action from the drop-down menu.
- Click the “Save” button.
Step 5🔗
To check if the failover is working or not, you could temporarily delete the db document in the primary Cloudant cluster which CIS Edge function pings and will return error code other than 200. This would automatically cause the traffic route to secondary cluster within 15 seconds in this case. You could select the db monitoring interval as per the NFR defined for your project.