Caching with Nginx
Cloudant and its open-source sibling Apache CouchDB were were born on the web. Their HTTP/HTTPS API is not a bolt-on afterthought - it is the way of interacting with the database built in from the ground up. Let’s take the use-case of Cloudant being used as a back-end database in a traditional client/server web app:
Web users interact with a web page, sending HTTP requests to one of a number of application servers. The application, needing data to render the page will make an HTTP request to Cloudant to get fetch the data and then respond back in kind to the client.
If the same request is being made to Cloudant over and over again in a short time frame, then Cloudant simply answers each request. Under production loads and to avoid overworking the database, developers may choose to cache data in their app rather than make a round-trip to the database. This is suitable for:
- data that doesn’t change very often e.g. a database of US zip codes
- slices of data that are accessed frequently but where it doesn’t matter when the user sees a slightly stale version of the query. This is very application-dependent but let’s imagine your e-commerce site is to have a list of three special offers on the front page. As the front page is accessed frequently, it makes little sense to query the database for every page render.

There are many ways to implement a cache. In this article I’ll show how a Nginx proxy can be created to cache HTTP requests to take some of the load off your Cloudant service and to get data to your app quickly.
What is Nginx?🔗
Nginx is an open-source web server. At its simplest it can serve out a tree of static files over HTTP. It can also be configured as a “reverse proxy”, that is it can sit between a client and server and transparently route traffic between them, caching some of the content to allow a future repeat request to be serviced from the local cached data.
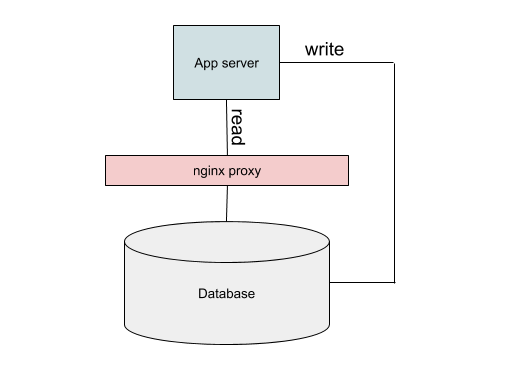
In our application we’ll be configuring Nginx as a reverse proxy and placing it between our application servers and Cloudant. Instead of our application connecting directly to Cloudant, it will instead connect to Nginx which will either return some cached content or make the Cloudant request and return that.
Nginx can be installed in two places:
- on the same machine as your application code (your app will connect to port on “localhost”.
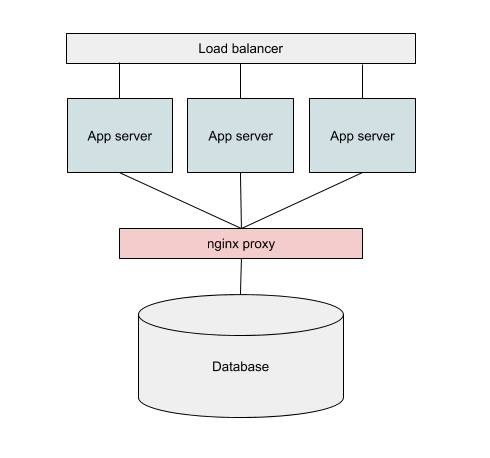
- or, on a separate machine your network and shared between multiple instances of your application server.
The former approach is simpler, but the second allows multiple application servers so share the same cache pool.
Installing Nginx🔗
Follow the installation instructions for your platform - on my Mac I used brew:
brew install nginx
Configuring Nginx🔗
The configuration for Nginx belongs in a file called nginx.conf. We’re going to leave the installed configuration as is and create a new one with the following content:
error_log /usr/local/var/log/nginxerror.log;
pid /usr/local/var/run/nginx.pid;

events {
}

http {

  # define custom log format with cache HIT/MISS
  log_format main '$remote_addr - $upstream_cache_status  [$time_local]  $status '
    '"$request" $body_bytes_sent "$http_referer" '
    '"$http_user_agent" "$http_x_forwarded_for"';
  access_log /usr/local/var/log/nginx/access.log  main;

  # define path where cached data is stored
  proxy_cache_path /tmp/cache keys_zone=cloudant:10m;

  server {

    # listen on port 8080 (HTTP)
    listen       8080;

    # this server's root directory maps to Cloudant's root
    location / {

      # define Cloudant root
      proxy_pass https://4268d9ec-250f-4d59-bcbd-fb47a14ef856-bluemix.cloudant.com;

      # pass through headers e.g. authentication
      proxy_pass_request_headers on;

      # cache data in the "cloudant" pool
      proxy_cache cloudant;

      # this is how the cache key is calculated
      proxy_cache_key $host$uri$is_args$args$request_body;

      # cached data from 200 requests is valid for 10 minutes
      proxy_cache_valid 200 10m;

      # even POST data is cached
      proxy_cache_methods GET HEAD POST;

      # add a header to show whether the data is a from cache or not
      add_header X-Cache-Status $upstream_cache_status;
    }
  }
}
N.B Change the hostname to the hostname of your Cloudant service in the proxy_pass line of the configuration file.
We can then run nginx with the command:
$ nginx -c $PWD/nginx.conf
and stop it with
$ nginx -s stop
To monitor nginx’s logs, simply tail the log file:
$ tail -f /usr/local/var/log/nginx/access.log
Testing the nginx proxy with curl🔗
I like to setup an environment variable containing the URL of my Cloudant service to save typing. In this case, the URL needs to be of the form:
$ export COUCH_URL="http://USERNAME:PASSWORD@localhost:8080"
Notice that:
- We are using
httpnothttps. Nginx is serving out HTTP only - it will use HTTPS to communicate with Cloudant from there but uses HTTP to service its clients. - We need to include our Cloudant username & password in the URL. Nginx will pass on the authentication headers we supply.
- We use
localhoston port 8080 as our hostname when we want to communicate with Cloudant via the proxy.
Now we can test the connection by visiting the top of the Cloudant API service:
$ curl $COUCH_URL/
{"couchdb":"Welcome","version":"2.1.1","vendor":{"name":"IBM Cloudant","version":"7410","variant":"paas"},"features":["geo","scheduler","iam"]}
It we repeat the request with the -i command-line switch, we can see whether the data is coming from Cloudant or via the cache by looking at the X-Cache-Status header:
$ curl -i $COUCH_URL
HTTP/1.1 200 OK
Server: nginx/1.15.6
Date: Fri, 16 Nov 2018 10:07:44 GMT
Content-Type: application/json
Content-Length: 144
Connection: keep-alive
Cache-Control: must-revalidate
X-Couch-Request-ID: 6204aa106f
X-Frame-Options: DENY
Strict-Transport-Security: max-age=31536000
X-Content-Type-Options: nosniff
X-Cloudant-Request-Class: unlimited
X-Cloudant-Backend: bm-cc-us-south-11
Via: 1.0 lb1.bm-cc-us-south-11 (Glum/1.66.0)
X-Cache-Status: HIT

{"couchdb":"Welcome","version":"2.1.1","vendor":{"name":"IBM Cloudant","version":"7410","variant":"paas"},"features":["geo","scheduler","iam"]}
In the nginx logs, you should see “HIT” or “MISS” against each entry:
127.0.0.1 - MISS  [16/Nov/2018:10:06:41 +0000]  200 "GET / HTTP/1.1" 144 "-" "curl/7.54.0" "-"
127.0.0.1 - HIT  [16/Nov/2018:10:07:44 +0000]  200 "GET / HTTP/1.1" 144 "-" "curl/7.54.0" "-"
The first fetch was a “MISS”, the second a “HIT”.
Try fetching some data and repeating the request to get the cached version. We can use the time command to get an idea of how much the cache is speeding things up e.g.
$ time curl -s $COUCH_URL/cities/_all_docs?limit=500 > /dev/null
real	0m0.849s
user	0m0.007s
sys	0m0.007s
$ time curl -s $COUCH_URL/cities/_all_docs?limit=500 > /dev/null
real	0m0.020s
user	0m0.007s
sys	0m0.006s
The first request took 850ms, the second (cached) request took 20ms.
Putting cache to work in your app🔗
Using the Nginx-powered cache in your own app is as simple as feeding a different URL to the Cloudant library:
// setup Express
const express = require('express')
const app = express()

// setup Cloudant library
const Cloudant = require('@cloudant/cloudant')
const cloudantReadOnly = Cloudant({
  url : `http://${process.env.USERNAME}:${process.env.password}@localhost:8080`,
  plugins: 'promises'
})
const cloudantWriteOnly = Cloudant({
  password: process.env.password,
  account: process.env.USERNAME,
  plugins: 'promises'
})

// home page
app.get('/', async (req, res) => {

  // do search
  const db = cloudantReadOnly.db.use('mydb')
  const doc = await db.find({selector: {"name": "London"}})
  res.send(doc)
})

app.listen(3000)
The above code makes two Cloudant objects: one to handle read-only requests via the Nginx proxy, the other for writes that connects directly to Cloudant. The root path of this app performs a Cloudant query via the proxy, outputting the result.
Running this app has the same performance profile as the curl tests: cached data is retrieved much faster than running a query on a Cloudant cluster on the other side of the world.
It’s worth bearing in mind that by caching repeated queries, Cloudant is handling fewer queries for you which will be reflected in provisioned throughput you need to buy in your Cloudant Lite and Standard plans provision. The “query” requests (POST /db/_find, GET /db/_all_docs, GET /db/_search, GET /db/_design/...) are the request types most-likely to eat up your Cloudant capacity. Caching queries helps to prevent maxing-out your Cloudant service and delivers better performance for your users.
When to use caching🔗
Employing caching is a trade-off between speed of returning the results against the freshness of data returned. If you know your data isn’t changing frequently, then a generous cache window (say an hour or a day) may be used. If it’s important that fresh data is surfaced to your users quickly, then a shorter window (say 5 or 10 minutes) may be better.
Caching works well when handling “peaky” traffic: let’s say a particular page on your site becomes popular because of the success of a marketing campaign. It’s better in this case to cache the pertinent content and deliver the results quickly, rather than wasting your Cloudant database resources producing the same results over and over again.
Caching can help take the load from your expensive primary data store by bring cheaper and faster resources to bear instead. Oh and cached data is returned faster.
The nginx configuration caches all GET & HEAD requests by default. I added POST to the proxy_cache_methods configuration to catch Cloudant Query API calls which use the POST /db/_find method. This may have unintended consequences if you route writes through this proxy e.g. POST /db/_bulk_docs or POST /db. I would recommend only sending read requests through the proxy and any API calls that modify data should be sent directly to Cloudant.